Random stuff for Friday, hurrah!
- Ooh, reading through Traveller.
- Runequest Classic Sale
I'm tempted to get a print and PDF copy of Runequest. James Mal suggests 2nd edition is the way to go. I'm not really going to play, I think, but I do want to read it. I've had lots of people suggest Griffin Mountain is amazing, but is it sit on my shelf after I read it amazing? Given the cost?
I should get 1st edition so I can see it from a historical perspective, but, maybe not. I'm not a historian of gaming. That said, I'd really like to read early editions of Pendragon and Chivalry & Sorcery at some point, too. I could get these in PDF only but I know from Tunnels & Trolls that it takes me longer to read a PDF, and I'm much less likely to just play a new game from a PDF. Use material for an existing game? Sure. New game? Nope.
I was shocked when I attempted to get the $20 hardback that shipping was $27 . . . because it's from the UK. Nevermind, softcover POD will do.
And yes, I know it's basically the CoC system . . . I played it when we ran Elfquest, but I'd like to see it as a more generic game system.
War in the East
So I did win War in the East. After my big offensive east, I finished the job on Turn 65. The game pretty much ended once I did - I grabbed a major city (Kazan), moved some units to consolidate my grab, and then as I was fiddling around moving up reinforcements I found many of the commands weren't working. I saved, when to exit the game, and the victory screen came up - ominious music, and scenes of flaming T-34s and German troops poking through wreckage. Decisive Victory. I'm glad I didn't choose one of the "Bitter End" scenarios, but had I done so I think I could have swept the Soviets completely from the map by, oh, turn 75-80 or so. Mostly because it would be hard to run them all down and to seize mountainous southern terrain.
In the end I controlled everything from Chelopets in the north to Kazan in the center, to Stalingrad, Saratov, Engels, Astrakhan, and I was a bit short of Baku (thank to stiff resistance, and ironically, lack of fuel.) I'd taken a bit under 2 million casualties and inflicted around 9 million on the Soviets. That's military . . . civilian losses must have been an appalling multiple of that, nevermind the inevitable sweep of folks meant for slave labor or death camps. Cheery victory, eh?
I was disappointed in the AI. I know I'd gutted the Soviet forces with a big encirclement or two, so offering resistance wasn't going to be easy, but suddenly it just kept pulling back from threatened strongpoints. I was able to just take city after city - often major ones - without any resistance. They'd be dug in, fort level 2 or 3, and very hard to flank . . . and pull out. Instead of spending 2-3 turns, maybe twice that, trying to leverage them out of some city or strongpoint, I was just handed them. That only happned on the last 10 turns, really, but it turned a race to win before winter into a bloody and quick rout.
I guess those Tiger Is can be used in North Africa? I literally had them used in one battle, and they did little except shoot some ammo off, burn some fuel, and have 2 break down in combat. The Soviet unit I struck fled quickly, routing, but only lost a handful of their tanks in the process. It never mattered.
Next time, I'll crank up the difficulty. I learned a lot. And yeah, if/when War in the East II comes out, I'm on it. Maybe I should fire up War in the West and give it a go next.
I've been re-reading AD&D spells recently, and I just want to say, I used to think Magic Jar was in incomprehensible spell. Now, I just think it's potentially comprehensible but a hot mess of explanation. I need to give it another go and see if I can wrap my ahead around how to play it out. No one ever took it, and no dungeon ever seemed to feature it. I'm glad for that.
- I love Morale systems. GURPS has one that's not as easy as, say, B/X D&D, but not as hard to use quickly as, say, AD&D's system. I tried to re-write the GURPS morale rules but ended up just deciding that maybe the original system is better than what I could generate. It works, if I remember to roll it. The PCs just try to shoot down and run down everyone who flees to ensure 100% casualties, so it's almost like save or die in my game when I do roll.
- Weird magic items are where it is at.
Showing posts sorted by relevance for query war in the east. Sort by date Show all posts
Showing posts sorted by relevance for query war in the east. Sort by date Show all posts
Friday, October 16, 2020


Wednesday, June 17, 2020
War in the East - Axis Turn 5 Start
Here are some screenshots depicting my current starting points in War in the East.
These are pre-arial reconnaissance, however, so if the Soviets seem thin on the ground it's because of that. They certainly have more units to oppose me, especially around Leningrad, Moscow, Kharkov, etc.
The Finns entered combat last turn, and knocked a couple Soviet units about in the north. The Soviets are pulling back, and I need to chase them and trap as many as I can because they'll just garrison Lenningrad. I want to take the city, and take it soon, as it can cement my naval control of the Baltic and supplies from the sea, and free up piles of divisions from a drive toward Moscow and the area around it.
Finland:

I got really, really lucky in the north. I had just enough MPs left to reach Pskov, assault the units dug in on the west side of the river, then two of the hexes on the east side, and then push a reserve unit through the mess and seize the city itself. I'm not sure it's technically a coup-de-main but I took the city on the run. Instead of having to pry out the Soviets from dug-in positions across a river, I just had to keep expanding my position and rammed a lot of infantry up through the gap.
Army Group North:

In the center, a bit of the same. Keeping in my mind my twin goals of a) not getting my panzers pinched off and isolated while b) not giving the Soviets a chance to form a defensive line, I kept up a steady move against Smolensk. A key I learned in my previous games was to punch a hole with my panzers and motorized divisions, line the sides of the hole with infantry, and then rush through. I haven't pulled off much of a kessel/pocket in a while, though, which concerns me, but having played Road to Smolensk and spent it grinding against dug-in troops in a solid line I'm happy with my current situation. I'll see if I can encircle some troops and cut off Smolensk and wipe out some more divisions. I also managed to punch across the river right near a bend, forcing the Soviets back from my easiest transit corridor. That reduced the ZOC effect across the river and means other units can move just a bit faster.
I also had two of my panzer corps do a HQ Buildup last turn - so they should have some rest and have more fuel and supplies and ammo this turn.
Army Group Center:

In the south, though, it's been tougher. The Lvov pocket was formed June 22-26 and closed since June 27th yet Lvov had a massive amount of supplies. So many of the units are still in good shape. I've been hammering them down but it's taking more effort than I expected. Although I was able to seize Kiev in a true coup-de-main (I just drove in, it was empty once I smashed a brigade in front of the city), it's so damn far from the trains and supplies that fuel has been a real issue. So is my porous flank to the south and somewhat to the north, too. The Soviets helped me by pulling back. I'll regret letting those divisions escape but I couldn't close them off without abandoning Kiev and my river crossing. I won't want to fight for those again.
Lvov Pocket:

Kiev:

Rumanian Border:

Overall it's been a lot of fun. There is so much to do and so few troops to do it, and the distances are staggering. Converting Soviet-gauge to standard European-gauge rails is a major issue in the game. Keeping them open is, too. I have no experience garrisoning against partisans, either, and I'm not sure how to go about doing it. I will figure it out. It's a tough game, too. Units have Movement Points (MP), Fatigue, damaged and ready AFVs/Guns/Squads/Trucks/etc., supplies, fuel, ammo, experience levels, morale, leadership skills of their leaders . . . and distance from the HQ matters, and the HQ from the superior HQ, and all of them from eventually O.K.H. and supply sources as well. You can use Administration Points to promote leaders or shift them around, or put them into units (I wasn't letting, say, Walter Model sit out the early part of the war) . . . but the cost varies based on how much of a change of the chain-of-command is involved. And leaders who don't like each other won't cooperate well. It's a mess. You get a real feel for how vast the war was.
Saturday, August 22, 2020
Gary Grigsby's War in the East - Axis Turn 36
I know everyone has been waiting on the edge of their seats - how am I doing in War in the East?
Let's go north to south.
Overall? See those numbers in the upper right hand corner? They say I have X number of trucks but (need X). So yeah, that's how I'm doing - I literally have only less than 2/3 of the motor vehicle transport I need. I have ~105K trucks, I need ~180K trucks. Oh, and they break down faster than I can manufacture them in these bad conditions. Many of my units are short on fuel, supply, and ammo. A few of my units are in the front lines and fighting incoming Soviet formations and have 25% of their listed TO&E. Amusingly, sometimes those units get "upgraded" to 1942-level units, but it's just a paper improvement because they can't get any reinforcements deployed to them. I'm losing 1 man for every 2 the Soviets do, but at least most of theirs are killed and captured, most of mine are disabled - and most of those will eventually return to the reinforcement pool.
Red-limned units are isolated.
Yellow-limned units are getting limited supply.
Red Soviet units have been promoted "Guards" status from combat experience.

Leningrad. I launched a winter offensive and pushed the Soviets back. I got tired of bouncing their units from my front and went for it as soon as the freeze hit. I am trying to connect my two fronts - the handful of Finns in the north and the Germans and Finns to the west - but the Soviets have bunched up a solid mass of troops in that area even as units withdraw thanks to their historical schedule.
Here I'm doing fine. It's a slog but the terrain dictates a slog.

Army Group North and Center. Here I'm slowly, grudgingly giving ground. I'm trying to hold on to a city or two but I lost a few valuable ones as the Soviets pour troops in north of Moscow. I had to deploy two of my Panzer divisions from winter quarters to stem the tide - and cut off a tank brigade and a cavalry brigade in the process. I'll liquidate them shortly but I can't seem to hold that area . . . and I had to deploy my reserves south of Moscow to deal with an even more serious hole in my lines.

Moscow. I took it when the computer inexplicably weakened its defenses a bit. Well, maybe not so inexplicable. I deployed a number of solid units there, kept some out of the front lines a reserves, and systematically ground up any Soviet units south of the city. So when they reinforced that area . . . I levered the others out of the city. I have a nice hole I punched through the lines but I can't secure the flanks over a large salient and the terrain dictates a slog.

Lipesk and Voronesh. This is a pocket in the making. I was stubborn about losing those cities, both of which anchored the sides of a flank and held some defensible terrain. Now I'm clawing to rescue the units there. It's getting ugly and it's taken a lot of reserve units moving up to salvage the situation . . . and I'm not sure how much it'll cost to get my panzers out of there.

Voroshilovgrad. The Soviets have pushed me back. I finished my high water mark of the original offensive at Boguchar and on the Don river. Hah. I've been steadily been pushed back since, mostly by so many units that I have to withdraw to avoid getting cut off.

Rostov. I narrowly missed taking Rostov. Now, my few non-smashed Romanian units are holding flanks in the hopes that the Soviets don't make a real push. A mixed panzer/motorized/cavalry force of Germans holds a major city and a few minor ones I can't afford to lose without unhinging the whole south. I ran rails to the city but partisans cut them off and the computer hasn't seen fit to bother deploying units to fix them - so I've been forced to slowly move back one of the larger rail repair divisions to try and fix that.
I did re-deploy von Manstein and I Corps - probably my best overall commander and my best all-infantry formations - to bolster the area in general. We'll see if that works.

Crimea. The Soviets are pushing out of Crimea. Not easy to see on this map, but I deployed some panzers in winter quarters north and west of here, so they eventually are setting themselves up for a Spring decapitation. I'm not sorry I didn't push into the Crimea back in the spring.
Random notes:
- it's interesting to see how multi-national Operation Barbarossa was. As the Axis, it's not the Germans vs. the Russians. On the Axis side are Germans, Italians, Romanians, Hungarians, Slovakians, Spanish (the 250th Infantry Division), French, Russians, and others I'm forgetting.
- nothing you do can really stem the Soviet tide. You can maul it but there are always more of them. And "pull back and use mobility against them!" sounds great until you actually have to do it, deplete a lot of strength as you lose tanks, artillery, trucks, and men to breakdowns and injury, and burn up supplies on the pull back, and then have insufficient fuel arriving to maneuver. But it's not unwinnable - it's just so damn bloody.
- changing to "Reduced Blizzard Effects" was a major decision. It really did allow me to seize Moscow and hold on a little better. I was getting totally, demoralizingly gutted under the harsh rules. I'd have lost about twice as many men and least twice as much ground had I left it alone. I was getting utterly destroyed, although the Finns were a death machine. I think the revised rules are more likely.
- Overall, as much as I like how air power can be used to hammer specific units before an offensive, I suspect I'll like the War in the East 2 "air phase" approach so I don't need to micro-manage my air power so much. The Soviets have been such a non-issue that I stopped bombing their airfields and just concentrate on ground combat support and air recon and we're doing just fine.
- You can compare with my Turn 18 situation, half of the game ago.
Good game. Takes a long time, but it's fun.
Monday, June 8, 2020
War in the East - Barbarossa - Off I Go East
I decided to give it a go - the whole 244-turn Grand Campaign in Gary Grigsby's War in the East.
I spent today tidying up a bit and getting Turn 2 rolling. Here is where I started turn 2:


It took three screenshots to show you most of it. The Romanians in the south haven't moved yet (they start turn 2) and the Finns in the north, either (turn 4) so I didn't include them. Or it would have been 5 screenshots.
I did okay with Army Group North, punching a hole in the front and seizing Riga (pro tip - spend the movement points to go around it and come at it from the east to avoid a contested river crossing.) I cut off some Soviet units and I've gotten a big chunk of my infantry moved up.
Army Group Center did great - I broke the defenses of Brest-Litovsk (historically, it held out for a week, which is 1 turn . . . in-game that's taking it on turn 2.) With that hole in the front I rushed through everything I had, and pushed two Panzer armies up and just about took Minsk, which the Soviets have abandoned. I could have consolidated my armor around Minsk better, but I didn't want to leave my supply lines open to a suicidal stab west by the Soviets. I have a full load of fuel, which probably won't last after this turn. So I expect turn 3 to be sitting in place building up supplies. My goal is to smash into the so-called Smolensk land bridge, between two major rivers, the Dvina and the Dnepr. It's barely doable but I have to try.
I put a lot of Soviets into one big and two small cauldrons (kessel) here. I'll destroy those units in the next week or two as reinforcing units come up. I'm not in a hurry to smash them unless they're in my way operationally.
You can see the big split of the Pripet Marshes, inspiration for the Cold Fens in DF Felltower.
Army Group South was also a good go - I made a run for the Romanian border and reached it, cutting off some Soviet troops to the west. They'll get ignored until the Hungarians and Romanians can mop them up. They'll fall eventually and I don't want to spend time and casualties dealing with them. Meanwhile, it's panzers east from here.
I followed up on the advice of an experienced player and chopped most of my German division down to a maximum of 80% of their TOE (table of equipment.) That'll mean the ones out of combat will send some of their troops to the replacement pool; the ones in won't get as many reinforcements. But the idea is to have a larger pool of infantry, especially, for dealing with the grinding assaults of the Soviets during the winter. I hope it helps . . . this is a campaign easily lost. Hopefully I won't do that.
Saturday, April 29, 2023
War in the East & operating vs. playing a game
I found the Three Moves Ahead podcast thanks to a link over at ACOUP. They mentioned "War in the East" so I found the episode where they discuss it.
Here is the link:
Three Moves Ahead: War in the East
One criticism of the game by the podcasters was that in a way you operate the game, rather than play it. In other words, much of what's going on in combat resolution is effectively a black box - it's hard to gauge the odds and the possible results. So you don't so much play the game as move the pieces around, try things, and see what happens. In other words, operate the interface.
I don't think that's entirely fair (or that my summation really does the argument justice.) But I can see where it comes from.
In a way, I like that about War in the East. It's resolving individual tank-on-tank attacks, company assaults, artillery bombing of units, and so on. You can turn the highest level of detail on and watch combat take place shot by shot (don't, it takes forever.) But you don't have to do it all. You can make an educated guess if you two Soviet infantry corps and two infantry divisions backed by front artillery is enough to prise a German division out of its fortifications behind a minor river . . . but you could save the game and play that fight out 10 times and get 10 different calculations of effective attack strength/results/etc. as random factors come into play.
And I like that. I like that it's not just some math-grinding of putting X units vs. Y units and getting Z effect 100% of the time. Or even 50% of the time. I like it when I put a single division a little too far forward and it gets mauled, or I put it forward and against all odds it holds out. The AI makes better guesses about what will work than I do, but that's fine - I make better decisions overall. I feel a lot more like STAVKA or O.K.H. when I order a front to attack, move it into place, and then sigh because they couldn't get the job done. Yet I still have enough control to feel like I'm making the good stuff happen - encirclements, reinforcing success and starving failure, implementing my own strategy and operational choices.
It was a good listen - especially on the pricing, actually. But this is what made me fire up WiTE while I was listening and play it. It's because I like the uncertainty and the level of decision making. Thought provoking stuff.
Tuesday, June 30, 2020
Gary Grigsby's War in the East - Axis Turn 18 start
I know, I know - I've been cluttering up my blog with all sorts of posts about "dungeons" and "fantasy" stuff. Crazy. So I'm giving the people what they want - more updates on War in the East!
So, the rasputitsa came - the Fall season of mud.
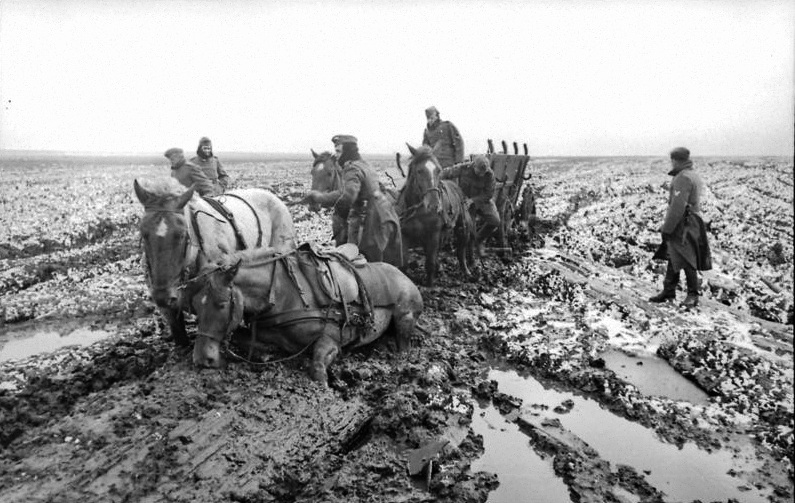
Here is my current situation on Turn 18 (10-16-1941).
I came just short of completely taking Lenningrad - one part of the city is still holding out. The muddy conditions even affects urban combat - I think that's a design issue with the game that'll certainly be revised in WITE2. So I lack the firepower to blast the Soviets out of that portion. Until I do, the Finns won't attack the Soviets past the line they're on.
I also fell just short of Moscow. I reached its suburbs - I was adjacent to the city's urban hexes - but as the weather called for mud I didn't want to get swamped in a massive Russian counterattack I pulled back. I had only a needle of penetration, anyway, and I couldn't crack the level 4 forts in the urban hexes. Forts range from 0-5 . . . 4 is formidable. You can see to the west of the city where I'd pushed in and was now pulling back.
South of the city I broke through, I could have effected a pocket had it been a month earlier. The Soviets have so many units in the area it's a slow to fight through, coupled with major and minor rivers and wooded terrain. Still, I took Bryansk. My units are all isolated as they're too far from the railheads for trucks to reach them. The only saving grace is the Soviet offensive operations are likely to fail, too. I just need to ensure I have an actual line - semi-isolated units out front can still be surrounding if the Soviets are willing to throw away men to do it. They are, so they will be. And the offensive penalties during rasputitsa means I cannot just do what I normally do - use my firepower to demolish the units trying.
Partisans are coming up in my rear, and I'm not sure they best way to deploy to keep them down.
In the south the Soviets are already pushing back as I close in on Rostov.
I blocked off the Crimea, but there is no way I have the firepower to punch through to it, and I need to hope the Romanians can hold the couple of hexes they hold.
It's a complete mess.
However, I think the mud ends in 3 turns (I'm playing with historical weather.)
Then I get a bit of hard ground to fight on as the blizzards roll in. I doubt I can take Moscow, but I'll consider a try if it seems possible. Stalingrad is too far - I couldn't drive there unopposed if the weather stays this way, nevermind fight my way there. All I'd really like at this point is to get a solid, defensible line that keeps my furthest major gains (Ryazan will be hard) and to seize Lenningrad. Opening up sea supply to the port, with the rails running from it, should help. Plus it'll shake loose von Manstein's panzers to be deployed . . . somewhere. It'll be interesting. I might get pushed, like the historical Axis, to go for a big blow in the South because the North is cemented in and the center is too damn hard to break.
Pictures - yeah, they're not pretty. It's the mud. For illustration I left on the "far from supply" and "isolated" toggles. Yellow is far from supply. Red is isolated. Yes, I outran my supply badly in the south . . . it's hard to keep the rail repair going forward and the railroads don't always run the way you'd hope.


So, the rasputitsa came - the Fall season of mud.
Here is my current situation on Turn 18 (10-16-1941).
I came just short of completely taking Lenningrad - one part of the city is still holding out. The muddy conditions even affects urban combat - I think that's a design issue with the game that'll certainly be revised in WITE2. So I lack the firepower to blast the Soviets out of that portion. Until I do, the Finns won't attack the Soviets past the line they're on.
I also fell just short of Moscow. I reached its suburbs - I was adjacent to the city's urban hexes - but as the weather called for mud I didn't want to get swamped in a massive Russian counterattack I pulled back. I had only a needle of penetration, anyway, and I couldn't crack the level 4 forts in the urban hexes. Forts range from 0-5 . . . 4 is formidable. You can see to the west of the city where I'd pushed in and was now pulling back.
South of the city I broke through, I could have effected a pocket had it been a month earlier. The Soviets have so many units in the area it's a slow to fight through, coupled with major and minor rivers and wooded terrain. Still, I took Bryansk. My units are all isolated as they're too far from the railheads for trucks to reach them. The only saving grace is the Soviet offensive operations are likely to fail, too. I just need to ensure I have an actual line - semi-isolated units out front can still be surrounding if the Soviets are willing to throw away men to do it. They are, so they will be. And the offensive penalties during rasputitsa means I cannot just do what I normally do - use my firepower to demolish the units trying.
Partisans are coming up in my rear, and I'm not sure they best way to deploy to keep them down.
In the south the Soviets are already pushing back as I close in on Rostov.
I blocked off the Crimea, but there is no way I have the firepower to punch through to it, and I need to hope the Romanians can hold the couple of hexes they hold.
It's a complete mess.
However, I think the mud ends in 3 turns (I'm playing with historical weather.)
Then I get a bit of hard ground to fight on as the blizzards roll in. I doubt I can take Moscow, but I'll consider a try if it seems possible. Stalingrad is too far - I couldn't drive there unopposed if the weather stays this way, nevermind fight my way there. All I'd really like at this point is to get a solid, defensible line that keeps my furthest major gains (Ryazan will be hard) and to seize Lenningrad. Opening up sea supply to the port, with the rails running from it, should help. Plus it'll shake loose von Manstein's panzers to be deployed . . . somewhere. It'll be interesting. I might get pushed, like the historical Axis, to go for a big blow in the South because the North is cemented in and the center is too damn hard to break.
Pictures - yeah, they're not pretty. It's the mud. For illustration I left on the "far from supply" and "isolated" toggles. Yellow is far from supply. Red is isolated. Yes, I outran my supply badly in the south . . . it's hard to keep the rail repair going forward and the railroads don't always run the way you'd hope.


Tuesday, December 29, 2015
Do you need a map for your megadungeon's world?
This was inspired by Beedo's post about needing a map for his megadungeon-as-crux-of-the-world game of Dwimmermount.
Basically, he wants/expects the events in his megadungeon to have world-affecting ramifications, such as wars and so on. So he needs a map of the world, right?
My response boils down to, not really.
You don't need to map what you don't need.
Unless the PCs are going to go to a place on the map, and unless the map is necessary for such a trip, you don't really need it. It's nice to have, I suppose, although what you define limits you - it's the canon conundrum. The more canon, the more answers you have ready, but the more you need to keep in mind when creating more or answering questions. What is defined limits you.
You want your campaign world to be complete, but that doesn't mean "has all possible details." Remember that "complete" means, in part, "having all necessary parts, elements, or steps". Necessary. Things you don't actually need to play the adventures at hand are just extras. You can have a complete megadungeon-based and megadungeon-driven gameworld without mapping the world that is affected by the dungeon. You just need those parts that will come up in play.
Incoming Consequences
But what if things in the far-off land affect the megadungeon (or limited sandbox / bounded adventure area, or other campaign area definition)? All you really need to know is how and why. If a war breaks out between North Valmont and the Empire of Madeupicus, so what? Unless either the player characters are going to those locations or folks from there are coming after the player characters or coming to the dungeon.
Outgoing Consequences
What if stuff done in the dungeon affects the outside world? Maybe that war happened becasue you found the Lost Crown of the Empire in the dungeons in that pink slime choked 10' x 10' room on level 2. Well, unless the players are going to that war, you still don't need much of a map. Or more than "this sparked a war in the far West, beyond the Plains of Aramore and still even beyond the Dust Dunes of Kawaku." Again, if the players are expected to go, you might want a map. If they'll direct the armies, you'll need one. Otherwise, roll 1d6 and give the side the PCs hand off the crown to a +1 to the roll, higher roll wins the war, tie is a stalemate. Done. Now back to counting torches and finding a way down to level 3. You'll soon enough meet victorious wandering fighters and defeated folks who can't go back home in the streets of the Megadungeon Town, looking to join or oppose your crew of adventurers.
Check out what I said about the bounded adventure area - if the players know the real adventure is in the dungeon, they'll stay in the dungeon. If they ask to go abroad, is it because you made abroad more attractive than the dungeon? Do they just want a change? More on that below.
Sometimes players can push for a map, though, even when it's not necessary.
So ask them.
Why do you want a map? If the players are insisting on a map, find out why. What is it about the map that they except to want or need?
Sometimes you have to keep probing. I learned this as a trainer - ask questions like a two-year old. Why? Why? Why? Why do you want to do X? Because I want result Y. Why do you want Y? Because if I get Y I'll also get Z. Now we've gotten somewhere - you don't want to do X, you just want Z. Let's go get Z.
In a megadungeon, often "go somewhere else" is a sign the players want something the dungeon isn't giving them. Find out what it is and stick it in there, or explain how it is already.
They won't play without a world map.
Some alternatives, though, for players who just have to have a map.
You come from it, you map it. Give the player the description of the location that you have in your notes (whether you wrote them or got them from a published source.) Tell the player to draw the map and provide the description.
You can do the vague outlines, if it's really necessary. But otherwise go all early Greyhawk on them and parcel out the land. You're from East McGinty? Map it. Tell me about it. I'm the GM but I don't know what "homeland" you have in your head.
This is especially true if the player has a character concept in mind. "I'm an Amazon from the jungles in the southern part of the Kingdom of Talmus." Okay, great, there are jungles in southern Talmus. There is much more chance of that being true if the player maps it than if you do. You don't want to hand them the map and have them say, "Gee, I wanted to be a jungle Amazon . . . " Detail restricts!
Rough sketch. Like it says. Do a rough sketch. Don't fill anything in that doesn't absolutely need to be on it. Don't go overboard. Don't make work for yourself until your megadungeon game is now a world-traveling game that happens to have a megadungeon in it.
All of this boils down to - don't make extra work for yourself. Don't end up telling stories that end with, ". . . but they never ended up going there." This is especially true if you're using someone else's material - plow your extra prep time into digesting and adjusting what's there, not making up a world you might never need.
(And if you want to map it anyway . . . )
Tuesday, June 23, 2020
War in the East - Axis Turn 11 Start
I managed to squeeze in 6 turns of Gary Grigsby's War in the East since my last post.
How am I doing?
My results are okay. Not great, but good . . . and I'm starting to wonder if "good" is "good enough" on the Russian Front!
So the front is so big, now, I needed to zoom out a tad more just to fit this in only five pictures. It would have been more like 7-8 without.
Army Group North

I've smashed a path to Leningrad. In the process, I'd trapped some units in Estonia, so I deployed two divisions and then a reinforcing corp to clean them up. They're mopping that up now, although it'll be a hard assault on the city itself. The Finns also pushed down to the "Finnish No Attack Line" - as far as they're willing to fight; basically, just short of where I really need them to fight. They're only interested in gaining back the territory they lost in the Winter War. They did manage to smash the garrison at Hanko, finally, but it declined in strength and numbers . . . I suspect the Soviets bled out some of the troops.
The rest of AGN isn't in bad shape, but not in great shape. I've cleared about half of the suburbs south of the Neva River, but the city itself is heavily fortified and garrisoned - a unit strength of "X" means 100+, and I can't even match that without the issues of forcing a major river crossing. My goal is to push East, but there are a LOT of troops, and the Soviets keep counterattacking hard to keep me from taking Novgorod and then pushing up to Lake Ladoga. I'd like to cut off Leningrad in the next month so they starve out. To do that I either need to take all of the lake ports, or cross the Neva River west of the city and take that port. Both are tough, and there is just a massive pile of Soviet troops. They don't break or shatter like they did on turns 1-4, either. Even 10 to 20:1 actual odds against tends to force a retreat in good order, not a rout. They counterattack any holes I break and force back my German divisions, costing them sometimes 50:1 losses but they can handle it.
So I'm pulling up more reinforcements to try and seize Novgorod, take the suburbs, and make a threatened end-run around Lake Ilmen to force the Soviets back. That might be too much, because I'm running low on men . . . but I do need to do all three.
A mistake was not pulling all of my heavy guns out of every front and moving them north - everything 203mm and larger - but I'm rectifying that now. It's making it hard to really smash dug-in troops but I'm doing what I can. (Also, unrelated, I made a mistake in pushing out construction units to front-line units. They're doing better work auto-assigned by OKH and the main HQs on rail work.)


Army Group Center, when we last left, had seized Smolensk. It basically stalled there, having to try and clear the waves of Soviet troops that poured into a big west-facing U shape. The Soviets even steadily pushed north toward Smolensk . . . I tried to stop them, then I just stalled until I could pincher them off. I did that last turn, and I'll annihilate the pockets troops ASAP. I punched a hole near Ryzhev toward Moscow, but I don't think I have the fuel and manpower to go through it.
I've got my rail lines getting very close to the front, finally. But I don't have enough units to do all the things I want, and the area west of Moscow is a tangle of rivers and forests. It's a slow slog, and I can't afford costly errors.
Still, it's shaping up. I'm hoping to seize Moscow before the snows fall, but I've read that a useful strategy is to seize a good defensive line instead to ride it out. We'll see.


In the south, I've managed to break a Soviet push toward Kiev and then connect with Army Group Center. I'm pushing to cut off Kursk and Kharkov, but fuel is an issue. Again, lack of fuel on my front-line units is slowing me down. But I've taken Odessa, and I'm pushing on Dnepropetrovsk. My goal is to cut off the cities and then capture the garrisons. I'll send some units to cut off the Crimea when I can. The South is so big that I'm throwing the Italians, Hungarians, and Rumanians all forward. They're vulnerable to Soviet armor, but I need to make weight here with any unit I can. Russia is so damn big.
I'm aiming at cities with important resources and armaments, because I can't afford to let the Russians keep them.
Overall, my best turn was a few turns back, on turn 9. I actually caused more than ~500,000 casualties in one turn, crushing two big pockets of Russian troops, and I wiped out 64 divisions and brigades that turn. The Russians can make more, but a destroyed unit loses more than a routed one, and it cost much more resources to make the replacements. Speaking of, I only captured ~65 T-34s, and way too many scrap-worthy T-26s and BT-7s. Guns, same - lots of captured 45mm AT guns and not enough 76.2mm AT guns. Come October some of my units might get captured T-34s and 76.2mm AT guns issued, and we'll need the mouse-eared machines and those solid AT guns.
At the moment, losses are:
Aircraft: 549 vs. 5,637
AFVs: 1,263 vs. 12,362
Guns: 3,020 vs. 28,304
Men: 224,182 vs. 2,317,526
Of those, ~56,000 dead and ~1,200 captured vs. ~272,000 dead and ~1,655,000 captured.
Fun game, but turns are starting to take 3 hours to complete. We'll see how I manage with this one. Like I said, I'm doing well . . . but is that good enough?
Saturday, April 13, 2019
The long, slow learning process of War in the East
As I mentioned, I picked up War in the East (and War in the West).
Learning to play is . . . a process.
The manual for WitE is very clearly written. But it's almost 300 pages. It's dense. The detail is immense.
A quick trial of the Minsk scenario quickly put me in my place - the manual must be read before I get anywhere. Got it.
WitW isn't any easier. I fired up Operation Husky - the invasion of Sicily - and it was even harder to get started on.
Both of the games are beautiful. The detail is excellent. The music is good (although I turn it off ASAP - a personal preference.) The graphics are clear. I feel like I need a gigantic monitor just so I can step back and see the frontage more clearly and get a feel for the whole battle area. I probably don't, but it gives that feeling.
My plan is to go back to War in the East after I finished reading this manual, watch a video or two of gameplay, and then try again. It doesn't matter how well I do, just that I learn to play. From there I can try to win the game, and try bigger and bigger scenarios. This is probably time I don't have a lot of, but I can do it in chunks and don't have to worry about jostling the map.
Still, having this game project to work on makes me happy. This is the detailed game I always wanted, on the massive scale I'd always dreamed of. I just can't say no.
Monday, April 19, 2021
GURPS DF Session 150, Cold Fens 9
Yesterday was a milestone - session 150 of my temporary, let's play until we get a real game going, something to do on weekends game of DF.
Date: April 18th, 2021
Weather: Partly sunny, cool.
Characters:
Aldwyn Hale, human knight (340 points)
Varmus the Hanged, human apprentice wizard (170 points)
Crogar, human barbarian (336 points)
Galen Longtread, human scout (490 points)
Gerrald Tarrant, human wizard (418 points)
3 skeletons (~35 points)
Heyden, human knight (308 points)
Ulf Sigurdson, human cleric (343 points)
Wyatt Sorrel, human swashbuckler (354 points)
We started out resolving a pre-game situation. Pre-game, we resolved the visit by Wyatt and Galen to the drum circle of the druids.
Wyatt and Galen hiked out, and sought out and found the druids. They explained their purpose, showed the weird plant suit they found, and rolled a reaction roll - and I allowed Galen to use Luck. He got a range of "Good" to "Very Good" - a 17, in the end.
Warlock, the head druid, explained the plant suit with called a Vineshield, and he and the other druids explained its powers and uses. Warlock said, "Listen man, we could really use that Vineshield, man." They offered 6 Great Healing potions, 4 Hindering Clay, and 2 Soil of Entombment for the item. Wyatt and Galen decided the Vineshield was really nice, but not nearly as nice as the very generous offer of Warlock and took the trade. Wyatt offered to escort them to the Lost City if they wanted to investigate, which Warlock though was righteous but not needed, man, and sent them on their way.
Back in town, the PCs met up and plotted. They decided the thing to do was to head to Swampsedge, to investigate rumors of trolls and lizard men. The last time anyone had been to Swampsedge was five and a half years earlier, when Gerry was sole survivor of a disasterous delve.
They gathered rumors, bought food, and hiked for the better part of a week to Swampsedge (there are faster routes, but not cheaper ones.)
In Swampsedge, they paused to review the rumors previous delvers had heard and recorded over their delves. Gerry didn't remember any of them, because Gerry doesn't remember anything not related to undead and magic, and not all of that, either.
The garrison and innkeeper told them that 6 miles or so south was the edge of the fens, and there were some fisherman who lived there. They headed that way. The found Old Crazy William's ramshakle and abandoned hut, and searched it again, and found nothing. Next door, a few miles away, was a woman (they call her "Karen") who was standoffish but was willing to allow that her neighbor might sell the group a boat. Ulf spoke about being a priest, and Bruce laughed about yeah, a priest and his skeletons. Yeah, the walking dead don't give you a reaction bonus.
The next person they found was Wat, who was looking to sell his boat. He said he was looking to be done with fishing, and wanted 2,000 for his boat and the location of another boat. Ulf plead with him for a discount on behalf of the church (not that he was buying this for the church), but Watt wasn't swayed. They haggled, and Watt offered to sell them the other boat only for 1,000 and take them there. In the end, Wat threw in everything except what he was carrying and his catch of the day for the 2,000. They counted out coins and gave him the gold and silver. He told them how to get to the other boat. Ulf drew up a contract and had Wat sign his mark (a rough W) and Ulf signed his name. Wat told him he could register it in town.
Wyatt, Ulf, Bruce, and Galen headed out on their new boat after instructing the others to get the house (actually, a fishing shack at best) into shape.
They headed out into the Cold Fens, dealing with leaping leeches (Galen killed a couple, Wyatt dodged one), biting insects, difficult boating, and more biting insects.
Aside: the Cold Fens are a mix of terrain. A bit east of where the PCs are exploring is more solid ground, like so:

The area right were the PCs are - where the Silver River fills the swamp - it looks like this, but with more moss and vines.

Add in the fact that those "channels" are water ranging from 6" deep to 6' deep (with a silty bottom which may be 1-2" to 1-2' of silt and muck), occasionally choked with weeds, and occasionally are over fallen trees, submerged rocks, and other hazards . . . and the going to slow. A shallow boat helps, but overloading them with SM+1 PCs loaded for heavy combat doesn't help anything. That requires some delicacy in movement. The "ground" might be wet earth, or muck, or reeds, or tree roots. Moss covers lots of areas, obscuring the difference between tangled roots and hard ground.
The PCs also had to contend with lack of ideal equipment. They have axes, but they're war axes, not broad-bladed work axes. They have short blades, but not proper machetes. They have boots and armor, but encumbrance is a major issue when dealing with uneven ground.
Why come here? Because a few solid islands exist, and so do ruins - of the Swamp Goblins, according to Heyden (who failed his Hidden Lore (Lost Civilizations) roll), possibly from the Old Fenopia. One solid island is tunneled under - a wonder in a swamp - and holds the Tomb of Sakatha. Others may hold other ruins.
So they headed into the fens. They meticulously followed the directions, and naturally skipped a step, got lost, headed back, and had to spend the night on shore after wasting a good six hours or so trying to get to the hidden, "spare," boat.
They came back to Wat's hut - now Ulf's - shortly before dark. Not long after they'd headed out in the first place, though, Gerry had cast Zombie Summoning, calling the nearest zombie within 10 miles to him. And within 30 minutes or so after the first boat returned, a skiff poled up to the edge of the fens near them, crewed by a dilapidated skeleton in tattered mail and scale. It was Rahtnar the Vegan, turned into a zombie by Gerry on his way out of the Cold Fens.
In the morning, greedy for a third boat, they loaded up their boats and headed out, this time following Wat's instructions without skipping a step. The encountered some biting insects, swarms of flying thumbnail-sized slicer beetles (ouch), and more biting insects. They avoided a sawyer that almost fouled their boat and delayed them a piece. They found the "cove" that he spoke of. There was no boat there, though. They immediately suspected Wat had come back in the meantime to take the boat. There was some sign that a skiff had been rammed aground here for a while, and then torn free of the muck, mud, and vines in the past day. Eventually they realized they had the boat already - it must be Rahtnar's skiff. That would explain why Wat was being cagey out having a "spare" boat, saying he was sure it would be there, and why he didn't find a way to tow a (valuable) boat back.
On the way back, they spotted a pair of trolls in the water about a quarter-mile off to the east. Clearly, it was deep, as one only had it heads above water. Another, in shallower water, was hunched over and digging around for something underwater. They quickly turned the boat and poled hard to the nearest land, and clambered out to get ready to fight, waiting for the trolls to arrive.
They didn't. The trolls ignored them, and went about fishing around for whatever they were seeking - catfish, muck-dwelling crayfish, who knows?
The PCs made it back to their base.
Rahtnar's skiff showed signs of having been run aground for a while, and significant (but not crippling) rot, when they headed back to Ulfhalla and examined it. Wyatt wanted to fix it but they lack the tools - and the boat would need stripping to the frame and boards cut and replaced, and no one has the skills for that.
They headed to the East, hoping to encounter more trolls.
Over the next day they made it to a curve of "land" and landing on the inside of the curve. They holed up, choosing comfort and concealment, and used their weapon-axes as tools to make cover for the boats. During the night, while Ulf and Bruce (IIRC) watched, they spotted figures moving in the distance. Humanoid figures. They woke Galen.
Galen got up, and could see figures around 500 yards or so off, on a spit of "land" that connected to the north with the same one they were on, but west of them. They had loinclothes or kilts, and clubs, and some wore skulls on their belts. Ulf declared them evil, because they had skulls. Bruce declared them cannibals, and just shrugged and was ready to move on.
Naturally, this meant that when they began to melt back into the tangle of trees, Galen shot the closest one in the back, aiming for the heart. It wasn't an easy shot - over 500 yards, -7 for darkness (-1 for Galen thanks to Night Vision 6), -3 for vitals, for a net -18 or so. Galen hit easily. Galen's shot was at 1/2 damage range - just over 500 yards - yet it still hit hard enough (16 HP of damage, halved to 8 HP) to force a death check and kill his target outright. The victim fell without a sound besides him hitting the ground.
Its fellows crouched behind cover. Galen shot two arrows at the next one. Without several seconds of aim, he had to just aim for the torso, but both hit, and that one fell, too - dead or alive, it wasn't clear, but it did scream in pain and surprise. ("They can talk, so we can negotiate with them.") The others went prone, and crept away out of sight. The PCs stayed up, waiting, knowing they could circle around.
They heard them north of their position. The sounds never got clearer. The humanoids figured out they had been attacked from the east, but obviously weren't able to figure out where the arrows came from, exactly.
Come morning, the PCs headed out on their boats, short on sleep but unmolested. They poled over to the corpse, which was still on its exposed spot, slumped over a tree root, with one leg trailing in the water.
Something had been at that foot, and gnawed more than half of it off. Other things had been at its legs.
It was a greyish-greenish skinned human-like figure with grey-and-white hair, sharp, pointy teeth, and a loincloth and a split thighbone club with a wedge of sharp rocked lashed into the notch with leather straps. Naturally, they summoned its spirit to question it.
His name was One-Who-Scouts-Ahead. He was part of a group of 3 and 1/2 fists. They were seeking food. The PCs asked about valuables (yes, they had the skulls of their wise ancestors and their fiercest enemies), enemies (all they can find to kill and eat), do they eat humans (of course), do they know where trolls lair (yes), how do we get there (gives directions), did they know where the dragon lives (south, on the hard ground), how many trolls in the lair (didn't know), where is there gold and silver (the trolls have metal that doesn't rust in their lair.) The directions weren't very easy to understand, but Gerry rejected asking for a clarification because the spell forces the truth, and it would already have directions as it knew how to give them.
Armed with that information, they poled around in the Fens for another two days, trying to find the troll lair, and arguing over the directions given to them. They encountered little. The weather was better, so they had fewer insects (a breeze kept them off.) They tried to steer near to land against Bruce's suggestion, until they saw a giant frog and realized he had a point, and stayed mid-"channel."
They did have one scary encounter - a dragon flew overhead. "What color?" Ulf had been asking everyone, and gotten one answer - dark. Well, this one, flying above, was dark. It flew southwest to southeast, and they were luckily (very luckily) in the shadow of some "land" when it went by. They waited a bit and moved on.
It took another full day, powered mostly by magically created food, to get near what they hoped was a shortcut back to Ulfhalla. It was not. They ended up in a dead end. They stayed overnight, using Vigil to keep Galen and Gerry up for a second night in a row, and then in the morning hacked and climbed and pushed a path though the trees to the waterway on the other side, carrying their 14' boat and 16' skiff. It took a lot of time - and a Luck use by Galen on his net 8 against Survival (as no one, including him, has the specialization needed), but they managed to do so. They poled their way "home" from there, and decided to rest up, recover, and gather themselves up in a couple of weeks for another crack at the swamp.
Notes:
- Session 150 wasn't as exciting as it could be, but it was good. They're down 2000 sp but up some property and knowledge. Next goals - not sure. They'll look for the troll lair, and maybe move south far enough to find that dragon. Ulf is convinced it is a black dragon, and thus acid-using, so he wants Resist Acid before they attack.
- I need a whole post on Clerical Investment and the expectations player's have of what influence that gives them. Also, of the downsides of bringing undead around with them everywhere. Gerry is clueless - it's a very fun character - but is everyone else clueless that outside of a dungeon, the skeletons aren't improving their appearance? Not that the others are anything less than an armored and extremely over-armed motley crew.
- The Cold Fens are based on the Pripyet Marshes. The pictures above are of that area.
- I was expecting to use zombie Rahtnar, but not exactly as I did. I figured eventually they'd find him, but not that Gerry would summon him right off the bat. The range was perfect, too. So, a dead PC is back. Gerry wants to keep him - so I'll figure out his cost as an Ally and maybe Gerry will spend some of his 25+ points to allow for that. I'm not sure if he wants to keep his group of lesser skeletons, too, but Zombie Rahtnar should have DX 17 and Axe/Mace-20, so maybe not. Speaking of points, Heyden has 47 saved, so he's a good delve short of a lens. Which lens? Who knows?
- The weather was very kind to the PCs. All "Passable" or better. The Boating rolls generally were not, but those just meant slower travel.
- I'm always amused by Summon Spirit. It does allow for PCs to get some very specific information, but mostly people meander around trying to elicit specific answers to specific questions and don't accomplish that much. If there is a downside, it's that it takes a long time to do the spell (1 question per minute), so with the right mix of casters, they can effectively keep it going as long as they need to, and get 10, 20, 30+ questions. You end up with a lot of marginal questions that way. Intelligence gathering takes some thought and flexibility, I think, and it gets tougher with 9 people asking questions than with 1-2.
- The wandering encounter rolls were kind after a while. Initially, they had to slog through issue after issue before the rolls just got friendly.
- XP was 0 for loot, 2 xp for exploration as they did a lot. MVP was Gerry for summoning Rahtnar. "Rahtnar," by the way, is "Ranthar" spelled backwards. Wyatt's player's first GURPS character was a dwarf named Ranthar.
- Roll20 was such a nightmare this game that it requires its own post so I don't poison this one.
Date: April 18th, 2021
Weather: Partly sunny, cool.
Characters:
Aldwyn Hale, human knight (340 points)
Varmus the Hanged, human apprentice wizard (170 points)
Crogar, human barbarian (336 points)
Galen Longtread, human scout (490 points)
Gerrald Tarrant, human wizard (418 points)
3 skeletons (~35 points)
Heyden, human knight (308 points)
Ulf Sigurdson, human cleric (343 points)
Wyatt Sorrel, human swashbuckler (354 points)
We started out resolving a pre-game situation. Pre-game, we resolved the visit by Wyatt and Galen to the drum circle of the druids.
Wyatt and Galen hiked out, and sought out and found the druids. They explained their purpose, showed the weird plant suit they found, and rolled a reaction roll - and I allowed Galen to use Luck. He got a range of "Good" to "Very Good" - a 17, in the end.
Warlock, the head druid, explained the plant suit with called a Vineshield, and he and the other druids explained its powers and uses. Warlock said, "Listen man, we could really use that Vineshield, man." They offered 6 Great Healing potions, 4 Hindering Clay, and 2 Soil of Entombment for the item. Wyatt and Galen decided the Vineshield was really nice, but not nearly as nice as the very generous offer of Warlock and took the trade. Wyatt offered to escort them to the Lost City if they wanted to investigate, which Warlock though was righteous but not needed, man, and sent them on their way.
Back in town, the PCs met up and plotted. They decided the thing to do was to head to Swampsedge, to investigate rumors of trolls and lizard men. The last time anyone had been to Swampsedge was five and a half years earlier, when Gerry was sole survivor of a disasterous delve.
They gathered rumors, bought food, and hiked for the better part of a week to Swampsedge (there are faster routes, but not cheaper ones.)
In Swampsedge, they paused to review the rumors previous delvers had heard and recorded over their delves. Gerry didn't remember any of them, because Gerry doesn't remember anything not related to undead and magic, and not all of that, either.
The garrison and innkeeper told them that 6 miles or so south was the edge of the fens, and there were some fisherman who lived there. They headed that way. The found Old Crazy William's ramshakle and abandoned hut, and searched it again, and found nothing. Next door, a few miles away, was a woman (they call her "Karen") who was standoffish but was willing to allow that her neighbor might sell the group a boat. Ulf spoke about being a priest, and Bruce laughed about yeah, a priest and his skeletons. Yeah, the walking dead don't give you a reaction bonus.
The next person they found was Wat, who was looking to sell his boat. He said he was looking to be done with fishing, and wanted 2,000 for his boat and the location of another boat. Ulf plead with him for a discount on behalf of the church (not that he was buying this for the church), but Watt wasn't swayed. They haggled, and Watt offered to sell them the other boat only for 1,000 and take them there. In the end, Wat threw in everything except what he was carrying and his catch of the day for the 2,000. They counted out coins and gave him the gold and silver. He told them how to get to the other boat. Ulf drew up a contract and had Wat sign his mark (a rough W) and Ulf signed his name. Wat told him he could register it in town.
Wyatt, Ulf, Bruce, and Galen headed out on their new boat after instructing the others to get the house (actually, a fishing shack at best) into shape.
They headed out into the Cold Fens, dealing with leaping leeches (Galen killed a couple, Wyatt dodged one), biting insects, difficult boating, and more biting insects.
Aside: the Cold Fens are a mix of terrain. A bit east of where the PCs are exploring is more solid ground, like so:
The area right were the PCs are - where the Silver River fills the swamp - it looks like this, but with more moss and vines.
Add in the fact that those "channels" are water ranging from 6" deep to 6' deep (with a silty bottom which may be 1-2" to 1-2' of silt and muck), occasionally choked with weeds, and occasionally are over fallen trees, submerged rocks, and other hazards . . . and the going to slow. A shallow boat helps, but overloading them with SM+1 PCs loaded for heavy combat doesn't help anything. That requires some delicacy in movement. The "ground" might be wet earth, or muck, or reeds, or tree roots. Moss covers lots of areas, obscuring the difference between tangled roots and hard ground.
The PCs also had to contend with lack of ideal equipment. They have axes, but they're war axes, not broad-bladed work axes. They have short blades, but not proper machetes. They have boots and armor, but encumbrance is a major issue when dealing with uneven ground.
Why come here? Because a few solid islands exist, and so do ruins - of the Swamp Goblins, according to Heyden (who failed his Hidden Lore (Lost Civilizations) roll), possibly from the Old Fenopia. One solid island is tunneled under - a wonder in a swamp - and holds the Tomb of Sakatha. Others may hold other ruins.
So they headed into the fens. They meticulously followed the directions, and naturally skipped a step, got lost, headed back, and had to spend the night on shore after wasting a good six hours or so trying to get to the hidden, "spare," boat.
They came back to Wat's hut - now Ulf's - shortly before dark. Not long after they'd headed out in the first place, though, Gerry had cast Zombie Summoning, calling the nearest zombie within 10 miles to him. And within 30 minutes or so after the first boat returned, a skiff poled up to the edge of the fens near them, crewed by a dilapidated skeleton in tattered mail and scale. It was Rahtnar the Vegan, turned into a zombie by Gerry on his way out of the Cold Fens.
In the morning, greedy for a third boat, they loaded up their boats and headed out, this time following Wat's instructions without skipping a step. The encountered some biting insects, swarms of flying thumbnail-sized slicer beetles (ouch), and more biting insects. They avoided a sawyer that almost fouled their boat and delayed them a piece. They found the "cove" that he spoke of. There was no boat there, though. They immediately suspected Wat had come back in the meantime to take the boat. There was some sign that a skiff had been rammed aground here for a while, and then torn free of the muck, mud, and vines in the past day. Eventually they realized they had the boat already - it must be Rahtnar's skiff. That would explain why Wat was being cagey out having a "spare" boat, saying he was sure it would be there, and why he didn't find a way to tow a (valuable) boat back.
On the way back, they spotted a pair of trolls in the water about a quarter-mile off to the east. Clearly, it was deep, as one only had it heads above water. Another, in shallower water, was hunched over and digging around for something underwater. They quickly turned the boat and poled hard to the nearest land, and clambered out to get ready to fight, waiting for the trolls to arrive.
They didn't. The trolls ignored them, and went about fishing around for whatever they were seeking - catfish, muck-dwelling crayfish, who knows?
The PCs made it back to their base.
Rahtnar's skiff showed signs of having been run aground for a while, and significant (but not crippling) rot, when they headed back to Ulfhalla and examined it. Wyatt wanted to fix it but they lack the tools - and the boat would need stripping to the frame and boards cut and replaced, and no one has the skills for that.
They headed to the East, hoping to encounter more trolls.
Over the next day they made it to a curve of "land" and landing on the inside of the curve. They holed up, choosing comfort and concealment, and used their weapon-axes as tools to make cover for the boats. During the night, while Ulf and Bruce (IIRC) watched, they spotted figures moving in the distance. Humanoid figures. They woke Galen.
Galen got up, and could see figures around 500 yards or so off, on a spit of "land" that connected to the north with the same one they were on, but west of them. They had loinclothes or kilts, and clubs, and some wore skulls on their belts. Ulf declared them evil, because they had skulls. Bruce declared them cannibals, and just shrugged and was ready to move on.
Naturally, this meant that when they began to melt back into the tangle of trees, Galen shot the closest one in the back, aiming for the heart. It wasn't an easy shot - over 500 yards, -7 for darkness (-1 for Galen thanks to Night Vision 6), -3 for vitals, for a net -18 or so. Galen hit easily. Galen's shot was at 1/2 damage range - just over 500 yards - yet it still hit hard enough (16 HP of damage, halved to 8 HP) to force a death check and kill his target outright. The victim fell without a sound besides him hitting the ground.
Its fellows crouched behind cover. Galen shot two arrows at the next one. Without several seconds of aim, he had to just aim for the torso, but both hit, and that one fell, too - dead or alive, it wasn't clear, but it did scream in pain and surprise. ("They can talk, so we can negotiate with them.") The others went prone, and crept away out of sight. The PCs stayed up, waiting, knowing they could circle around.
They heard them north of their position. The sounds never got clearer. The humanoids figured out they had been attacked from the east, but obviously weren't able to figure out where the arrows came from, exactly.
Come morning, the PCs headed out on their boats, short on sleep but unmolested. They poled over to the corpse, which was still on its exposed spot, slumped over a tree root, with one leg trailing in the water.
Something had been at that foot, and gnawed more than half of it off. Other things had been at its legs.
It was a greyish-greenish skinned human-like figure with grey-and-white hair, sharp, pointy teeth, and a loincloth and a split thighbone club with a wedge of sharp rocked lashed into the notch with leather straps. Naturally, they summoned its spirit to question it.
His name was One-Who-Scouts-Ahead. He was part of a group of 3 and 1/2 fists. They were seeking food. The PCs asked about valuables (yes, they had the skulls of their wise ancestors and their fiercest enemies), enemies (all they can find to kill and eat), do they eat humans (of course), do they know where trolls lair (yes), how do we get there (gives directions), did they know where the dragon lives (south, on the hard ground), how many trolls in the lair (didn't know), where is there gold and silver (the trolls have metal that doesn't rust in their lair.) The directions weren't very easy to understand, but Gerry rejected asking for a clarification because the spell forces the truth, and it would already have directions as it knew how to give them.
Armed with that information, they poled around in the Fens for another two days, trying to find the troll lair, and arguing over the directions given to them. They encountered little. The weather was better, so they had fewer insects (a breeze kept them off.) They tried to steer near to land against Bruce's suggestion, until they saw a giant frog and realized he had a point, and stayed mid-"channel."
They did have one scary encounter - a dragon flew overhead. "What color?" Ulf had been asking everyone, and gotten one answer - dark. Well, this one, flying above, was dark. It flew southwest to southeast, and they were luckily (very luckily) in the shadow of some "land" when it went by. They waited a bit and moved on.
It took another full day, powered mostly by magically created food, to get near what they hoped was a shortcut back to Ulfhalla. It was not. They ended up in a dead end. They stayed overnight, using Vigil to keep Galen and Gerry up for a second night in a row, and then in the morning hacked and climbed and pushed a path though the trees to the waterway on the other side, carrying their 14' boat and 16' skiff. It took a lot of time - and a Luck use by Galen on his net 8 against Survival (as no one, including him, has the specialization needed), but they managed to do so. They poled their way "home" from there, and decided to rest up, recover, and gather themselves up in a couple of weeks for another crack at the swamp.
Notes:
- Session 150 wasn't as exciting as it could be, but it was good. They're down 2000 sp but up some property and knowledge. Next goals - not sure. They'll look for the troll lair, and maybe move south far enough to find that dragon. Ulf is convinced it is a black dragon, and thus acid-using, so he wants Resist Acid before they attack.
- I need a whole post on Clerical Investment and the expectations player's have of what influence that gives them. Also, of the downsides of bringing undead around with them everywhere. Gerry is clueless - it's a very fun character - but is everyone else clueless that outside of a dungeon, the skeletons aren't improving their appearance? Not that the others are anything less than an armored and extremely over-armed motley crew.
- The Cold Fens are based on the Pripyet Marshes. The pictures above are of that area.
- I was expecting to use zombie Rahtnar, but not exactly as I did. I figured eventually they'd find him, but not that Gerry would summon him right off the bat. The range was perfect, too. So, a dead PC is back. Gerry wants to keep him - so I'll figure out his cost as an Ally and maybe Gerry will spend some of his 25+ points to allow for that. I'm not sure if he wants to keep his group of lesser skeletons, too, but Zombie Rahtnar should have DX 17 and Axe/Mace-20, so maybe not. Speaking of points, Heyden has 47 saved, so he's a good delve short of a lens. Which lens? Who knows?
- The weather was very kind to the PCs. All "Passable" or better. The Boating rolls generally were not, but those just meant slower travel.
- I'm always amused by Summon Spirit. It does allow for PCs to get some very specific information, but mostly people meander around trying to elicit specific answers to specific questions and don't accomplish that much. If there is a downside, it's that it takes a long time to do the spell (1 question per minute), so with the right mix of casters, they can effectively keep it going as long as they need to, and get 10, 20, 30+ questions. You end up with a lot of marginal questions that way. Intelligence gathering takes some thought and flexibility, I think, and it gets tougher with 9 people asking questions than with 1-2.
- The wandering encounter rolls were kind after a while. Initially, they had to slog through issue after issue before the rolls just got friendly.
- XP was 0 for loot, 2 xp for exploration as they did a lot. MVP was Gerry for summoning Rahtnar. "Rahtnar," by the way, is "Ranthar" spelled backwards. Wyatt's player's first GURPS character was a dwarf named Ranthar.
- Roll20 was such a nightmare this game that it requires its own post so I don't poison this one.
Monday, August 18, 2014
GURPS Gamma World, 20th Homeland - Session 1
As I mentioned yesterday, we got our Gamma World game rolling.
Characters:
"Hillbilly" (me)
"Caveman" (Jon L)
"Short Bus" (Mike D)
"Princess" (Andy D)
"Barbie" (Mike H)
We woke up from a dream-filled sleep at the start of the session. We spilled out of cryogenic containers in our boxers, in a dilapidated and clearly long-abandoned bunker we later found out was code-named "Van Buren." Some of the cryo containers were black, some empty, some spilled out choking and rapidly dying troopers. Others were intact, but there was no clear way to activate them.
We were part of 4th Squad, C Company, 3rd Rifle Platoon from 1-90, 4th BGT, 20th Homeland Division.
At this point, the GM handed us identical character sheets with a pick-list of disads and skill packages and upgrades to choose from. He also handed one of us a bunch of cards with pre-chosen "callsign" nicknames on them . . . and we each chose one for the person on our left. Hence the awesome nicknames we would never choose for ourselves.

After this, some C-3PO-crude androids told us the rest of our unit was already deployed, and a Adjunct Captain Hopper was waiting for us outside. Before that, we had 15 (real-world) minutes to select gear before the damaged air conditioning units ran down too far to let us continue to breathe. We started grabbing guns, and decided to standardize around 7.62mm because of its higher damage than the M4 series, and around 9mm for small arms. So we ended up with an M110, three SCAR-Hs, an M14, and six 9mm pistols. We also grabbed a rainbow of injectors with no clear idea what they do. Naturally we pushed out time to at least 20 minutes, and choking and faint, stumbled out of the bunker laden down with guns and ammo and food and such. Oh, and wind-up watches that double as rad detectors. Handy! Worrying.
Some scrawled hints from predecessors included this one, which Cavemen made sure to memorize: "It it's blue, good for you. If it's green, keep it clean. If it's red, burn your dead. If it's black..."
Naturally when we exited the bunker, there was no sign of any greater robot, no Captain Hopper, no nothing - and no way to re-open the door. Nice. We sorted out the extra gear Caveman dragged out and then parceled it out. We hiked up the tunnel to the greenish light we saw in the distance. We found what looked like an AT-ST sized ED-209. I shimmied up and let down a rope for Short Bus, who examined it as best he could. We weren't able to determine much except it was pretty high tech, but also extremely old and rusted.
The world around us was also startling. The sky was green, overcast, and bright-ish. The ground was greened and mossed/molded over, and "snow" of mold was coming down lightly. We were able to identify a road under the mold, and decided to follow it.
After a day's hike, we camped along the side of the road, in shifts, letting one guy sleep the whole night. Nothing molested us, but "night" was just a dimming of the overcast brightness of day.
In the "morning" we headed out, and came to a chasm spanned by the one-winged fuselage of an aircraft bigger than the biggest airlines we ever saw. We'd have to enter First, exit Steerage. Out on the wing was a wooden contraption looking like a Christmas tree. We checked that out first (well, scouts did under the guns of overwatch) but couldn't determine anything except that it was man-made. We couldn't see in - if I recall correctly the windows didn't angle well or were covered where they did.
We entered the fuselage. Inside, it split around a central walled area. So we left Princess with his M110 sniper rifle to watch the right, and the four of us started up the left. The idea was, he could guard our six and flank, we'd concentrate force on the left, and then we could link up with him either comeback toward him or fetch him down the cleared side.
We heard some sounds that indicated that there were occupants. So we moved in, assuming hostiles. We found some - almost immediately we came under fire from bows and were charged by mail-armored spear-toting 1.5m tall badgers. We dubbed them Badders with no meta-knowledge whatsoever. Their arrows were spark plug tipped, the spears and mail showed signs of scrounged and re-purposed materials.
We had a brawl. Short Bus lead with an entry shield and his 9mm, the rest of us had long arms out. Short Bus blocked a few arrows that studded into his shield, and I wasn't able to spot the bowmen well enough to do much except take an arrow in the left shoulder and then one in the left leg, both missing my trauma plates. In return, I perforated a couple of badders and hosed down a few interior walls around torso height to kill anyone behind the cover. Meanwhile their armor shrugged off the head shots of Short Bus, but the 7.62mm shots we fired did well, killing most of them in short order (especially if we managed 2-3 rounds into a single badder.)
Princess shot down some guys advancing down his wing. Barbie advanced aggressively along with Short Bus and short down at least a half-dozen of the critters. Cavemman and I advanced a little more cautiously and shot down targets of opportunity and shot up cover that would be an obvious shelter for the bowmen.
In the end, those, we killed 20 of the badders. We decapitated them and tossed them off the cliff, and otherwise checked them for loot - none. Huh.

(In retrospect, we maybe should have sent someone over the top, maybe everyone. Oh well.)
On the far side of the plane we found 3 men buried to their necks. Two were dead, the other was a green guy. A big dog came out of the woods and emoted at us, and let us know the green dude was its master. Those of us with folding shovels got to work and got him out. We couldn't communicate with him, but we showed we'd follow him and dubbed him Bruce for no reason I can now recall.
We followed him to a village where the last of Bal'Cree tribe live, despite having a big sign saying Kamp Kazoo. We met their elder, the Elder Kell, their second-in-command, Agar (who carries an M16A4 and a stop sign shield), and their champion, the ape-centaur Peyonne.
We also met an English-speaking man named Servin the Younger, who told us he was a Restorationist. He'd learned English from books, and led us to his shelter. We talked with him.
Here I'm quoting our GM:
"The other 20th's that woke up in the past seem to have been the One-Ninety's Company B and Company D, which were listed as "Active/Evacuated". That would be about 500 personnel, lead by a Major Ward, which became allies with the Bal'Cree community of tribes. Ward named his solders "Gamma's Ghosts". Ward and his Ghosts arrived in the area "about 120 snows ago". The war with the Badders lasted "forty generations". The war ended and the Ghosts departed "about 60 snows ago". A "snow" seems to be less than a year. A "generation" is a Badder generation, duration unknown."
And that's what we pulled out of talking to him. Basically, the 20th woke up, partly, came out, tried to set up civilization, fought Badders, and then headed off looking for the US of A. Or something to help them restart it. Also, to the north we heard about "Purists" - guys who hated mutants. I joked about joining the good guys, but it didn't go over.
Oh yeah, and somewhere in here someone pointed at my wound and told me about a red arrow. Aha. We tried one of the colored injectors we'd scrounged and it healed up my injury. Nice.
Naturally, we got the Restorationist to translate for us, heard some badders had raided the tribe along with armored men, and agreed to go off and hunt them down. Because, f*** you badders.
We rested, ate, and headed out with a tamarind-looking guide called Chee. It lead us to an "Elevator Highway" - elevated highway - and we climbed up. On the lower level, which was set for rails, we found long-abandoned evidence of a 20th Homeland HQ. Chee left us alone, and we eventually climbed up to meet it.
We followed until we reached, many hours later, a statue to a tribesman and a 20th Homeland guy. Probably a Gamma Ghost.
At that point the highway ended, and we climbed down.
We found an impact crater with hills inside, and armed with a map from Chee (who took off), headed into it. We noticed we had a bit more background radiation.

We started to explore it, and spotted a guard - one of those armored men. "Robot" said me. No one disagreed. There was some silly talk about negotiating, but instead we had Princess shoot it in the torso. It turned to us and charged! So we took knees and aimed, and when it got closer (despite another shot from Princess) we shot. It took a few rounds from me, Short Bus, and Barbie (while Caveman watched our flank) and it dropped.
We checked it out - it had US Military-like gear, a bullpup rifle (I took it), a telecoping baton (Barbie took that), and nothing else. Naturally, it was a robot, although uniformed.
Another hill had a burned-out gallows on it. From there, we kept moving and up a hill marked oddly on our map. As we did, Princess saw 3 robots marching around towards us. He got a little jumpy on the trigger and shot the lead one. It charged him as the other two ran the other way. Uh-oh. We charged up the hill, felt the warmth of more radiation, and then turned and ran back. Meanwhile Princess kept shooting, so we lined up and waited for his target to come into view. When the robot did, we shot it to hell.
We stopped there.
Addendum
Quoting the GM:
"I'll mention a couple of things you left out, not to imply that they're significant, but to be there to remind folks if they look back over your summary to refresh their memories before we play again.
1) Between the Plane Bridge and the outskirts of Kamp Kazoo, the PCs arrived at an intersection at which a number of roads and paths came together. In addition to the road they were already on (coming in from the west, and exiting to the east) there were two overgrown footpaths: one leading northwest and the other southwest. A wide and largely level road went south. In the middle of the intersection was a M*A*S*H-style signpost identifying them, but it was molded over and illegible.
2) Between the entrance to Kamp Kazoo and the Bal'Cree village was a large depression in the ground, about the size of a large sports stadium. Inside were thousands of gravestones arranged in cramped rows, like Arlington or the cemeteries for WWII GIs in Normandy.
You also didn't mention the as-yet-unidentified case of "black baseballs" that Caveman stashed in his ruck. I'm sure those aren't important, though. I bet the Ghosts just loved playing baseball during downtime in the war with the Badders. If you're going to restore the United States, you gotta restore our national pastime first, otherwise what's the point, right?"
Notes:
I think there are two ways to play Gamma World. One, be serious. Feel the weight of the apocalypse, fret over the lost loved ones and the darkness of the setting. Or just take the joke as it is and get on with shooting mutant badgers. I went for the latter from the word go, because that's how I like my games to unfold.
The game was slightly on rails, which is pretty much ideal when you get started - everyone wants to do stuff, no one has any idea what that stuff could be.
Our GM is using GURPS, fairly light as far as I can tell, along with a lot from GURPS Action. The range bands made combat really easy to deal with. Lots of shots at -0, then some a -7, some at -11. No problems, no "I step so my range penalty goes down."
He also rolled damage, so we just shot and saw hits, but had to observe the results. It worked well, and I don't think anyone even batted an eye when he just started that up.
The GM prep work was amazing, too, and let the action unfold smoothly and easily.
It was a really good time, and I'm looking forward to playing out the rest of the session.
Friday, August 2, 2019
War in the East Supply notes
So I did take advantage of my break to really put some time into learning Gary Grigsby's War in the East.
What really killed me was supply - I'd regularly outrun supply, especially with my panzer and motorized divisions - and have my offensive grind to a halt while I found ways to force fuel back up to the front.
Looking at some AARs helped, but so often they were in Beginner mode and I started in Intermediate, so they'd manage to break through the Soviets much more easily and supply much more effectively.
But I did find a simple but useful guide to supply here:
War in the East Supply Basics
It's very basic, but that's what I needed - something that just told me what to do and where to look.
Armed with that, I fired up a scenario I'd been playing - Road to Leningrad - and tried what I knew. I started with my panzers already out of fuel, and did what I could to rescue the situation. I managed, but the loss of momentum (and some other mistakes later on with support and unit distribution) kept me from taking more than half of Leningrad itself and left with an Axis Minor Victory instead of the Major Victory I'd hoped for. Well, that and not being able to cut off supply to the Soviets in the city, which I'd thought I'd done enough to effect but apparently had not.
The next time I played a bit, I was able to keep my fuel-sucking panzers in fuel the entire time. What a difference that made - I haven't finished that playthrough, but I'm much more solid.
Now to learn administrative tasks, like creating units (support and otherwise), replacing officers, creating new formations, and reassigning units to new HQs. Some of that I've done in play, but mostly ad hoc.
Fun game. Hard, but fun.
Friday, July 3, 2020
Friday Roundup 7/3/2020
It's a Friday, so I like to link to posts or post random little tidbits. Today is no exception.
- Over at the Nine and Thirty Kingdoms, Talysman has an idea - can you expand the idea, nebulous in OD&D, that margin of success matters on a strike? And then, can you assign special, critical effects on that strike, over and above (but possibly affecting) the damage?
It's a good idea. It's not a new idea, though. That'e the core of Arms Law from Rolemaster. In Rolemaster, you roll a "to hit" roll that is modified by your attack skill and modifiers and the defensive skill and modifiers of the target. The margin is looked up on a table, which tells you the concussion hits (HP loss, basically) and what level of critical to roll. That critical can and does modifier the effects and damage on the target.
I'm not dissing Talysman here. I'm just pointing out that he's on the same logic trip - and roll approach - of another system I really liked. Margin of success modifications to results, or determination of results, has a lot to say for it as a mechanic.
- The GURPS PDF Kickstarter is still going:
DF21 is still locked, and not even displayed, as a stretch goal. I figure it's probably going to unlock at $44K or $45K based on the other jumps between unlocks.
- I'm stalled in War in the East, at least mentally at the moment. I got through the mud but now the Soviets have a solid front in front of me. I need to decide where to put my efforts to break it; I can't just chase everywhere like the heady days of July and August 1941.
I did finally take the rest of Leningrad, stabilized my front and even advanced it by crushing a few Russian salients, and otherwise made good use of the time. Now the snow is here and I'm moving East again. I might be able to take Moscow but I might not be able to keep it. I could move my armor there en masse but it'll take time and the terrain in front of Moscow is a tangle of woods and rivers - places where armor suffers lots of penalties and takes lots of casualties. It's already looking tempting to dig in so I can hold on for dear life in the winter and then transfer my mobile elements from Army Group North to Army Group South and make a big push on Stalingrad and the oil I need in the Caucasus mountains. Yeah, I know, I know. Suddenly the OKH doesn't look like a bunch of idiots doing something obviously wrong. I'll post pictures after a few more turns.
And I should say, all of this is with Panzer IIc, Panzer IIIg, Panzer IVe, and Pz-38t tanks as my primary workhorses . . . by the time you get to Tigers and Panthers and Panzer IVg tanks in any numbers, you better have won the war or you're bound to lose it.
- Dreams in the Lichhouse is revising its blogroll. The comments are full of blog suggestions. If you want to suggest one, or suggest your own, or (like me) browse for more blogs you might like, take a look.
- A rabbit hole of link-following led me back to this post:
Same Description, Same Rules
I feel that's a good rule of thumb. A related idea drives my color scheme.
Speaking of old posts of mine, here is one idea I liked but haven't really implemented. I really should use something like it - not necessarily "first time always works" as I have players that will abuse that, but perhaps "it works this time because of amazing luck and timing and coincidence" to help players get past being stuck. Don't forget to read the followup if you're considering doing the same.
- This blog has some very good advice on painting - she paints well and explains well. That's very, very valuable.
Saturday, July 18, 2020
War in the East wishlist
War in the East 2 is already in playtesting, so I doubt that I'm anywhere near on time to push things along.
But as I play War in the East, I'd really like a few things, so here they are:
Visual Supply.
Right now, units will show you how far they are from HQ and railhead. So will HQs. I can pull up supply details for each unit and see how they got their supply last turn - and how much, and when (there are 3 supply phases.) But it's really hard for me to understand that on the big picture. All too often I see people playing out games like, say, this one, where he took Smolensk in July and Moscow by August. Me, I can't replicate that because I've eternally either running my panzers out of supply or I'm deliberately keeping them back to keep them in supply. It's very frustrating to have a unit run out of gas or have minimal fuel, but be, say, 10-20 miles (1-2 hexes) from a unit that got topped off with a lot of fuel. Okay, fine, too far is too far. But I didn't know that when I moved, because it's hard for me to keep track. I'd have moved the out-of-fuel unit back, or maybe not run it so far forward, if I was able to determine ahead of time what the supply situation was. And I can, it's just exceedingly difficult for me to do on a per-turn basis.
I'd love to be able to put a colored overlay on the map - green for hexes within railhead supply, yellow for hexes within truck supply, red for hexes out of supply. Maybe even a four-color model where I could see how many trucks we're talking. That way I can make my decisions based on information I can see and process on a sufficiently broad scale that I can use it. Visual beats charts of numbers.
Combat Detail Displays.
Right now, you can set combat from a brief overview all the way down to individual units firing and their target and range. I'd love to be able to see that after a fight - run through all of the combats quickly, then go back and drill down and see what happened. Just because I don't want to spend a minute or two on each battle doesn't mean I don't care. I'd like to see that when I lost 22 AFVs and took out 75 what AFVs I lost (and how) and what ones I took out (and how.) Don't seal off that information; the game has it, I'd like to see it displayed just on my own terms.
Support Unit Displays.
It's hard for me to keep track of where my various support units are. It would be nice to be able to pull them up on a display and go to them. Being able to group-grab and reassign would be awesome, too.
Actually being able to see what units are in range of what support units would help, too. I assign some to higher HQs because an army group or an army needs them, not just a specific corps . . . but I can't always be sure they're where they need to be to get used. It's a bit annoying. Not a killer, but when you've got a small pool of Luftwaffe anti-air units with 88mm FLAK guns and want to protect an area, I don't always want to give them out down to a division. But I equally hate realizing no one was supported by them because they weren't handed down because of my poor choice of HQ positioning. Again, visual would help.
Better Hotlinking.
I should be able to click on a unit in any given report and go to it, or any given unit and go back to a report.
And within my commander's report for the turn, I do want to be able to click on, say, a unit upgraded from Infantry Division 39 to Infantry Division 42 and see what that means, exactly. And which ones on the map not just on a list that I can't use to find those units.
Better controls of construction units.
Construction units under HQs will get assigned out to rebuild rails. Okay, great, love it.
I don't love when 3-5 units are all working on the same stub rail line that doesn't help me. Or they're busy trying to cross-link all of the rails in Belarus while I'm short on units just a few hexes away to cross-link where it actually matters. And so on. I don't mind some inefficiency if I allow the computer to take over, but I do mind it when I'm not allowed to take over.
Like I said, probably too late for all of that, and I'm not even sure where I'd post it to make sure Matrix Games sees it, but there we go. I'd plunk down $80 for the new game if it did all of that. It's all just stuff that makes it easier for me to play by taking the interface issues out of the way.
Tuesday, July 21, 2020
War in the East - Update & Restart
I played a few more turns of Gary Grigsby's War in the East, and then I had to bag it. I was basically getting destroyed along most fronts.
I was holding Moscow, but getting pushed back on both flanks despite fortifications and solid units in reasonable supply.
I was getting destroyed basically from Tula to Rostov, rolled back and units were getting trashed.
I'd lost so many trucks trying to supply the troops that I couldn't sustain another 2-3 turns before my entire supply system was going to break down. I hadn't even hit peak Ice levels in some theaters.
Meanwhile, my Finnish ski troops got a massive jump in firepower and started destroying dug-in Soviets with impunity.
Now I get why people say that "Reduced Blizzard Mode" is better for the campaign game and "Historical" blizzard for the individual scenarios.
I've seen AARs that say otherwise . . . but I keep seeing those folks making massive gains I couldn't manage, taking huge hunks of the USSR beyond what I was able to . . . and not listing their difficulty level. I suspect that on "Easy" difficulty the issues I've had with fuel and casualties wouldn't be so much. I'm on Normal, which is already pretty hard.
So I had to wuss out and drop the weather down.
It's not easier, per se, but it does drop the automatic bonuses to winter troops a bit, and it changes some of the punishing effects to a flat effect instead of a random one. So maybe I won't get attacked by the Soviets and repel them with heavy casualties and then crumple under a smaller, second attack.
I went back to the first turn before the blizzard hit, so I couldn't take advantage of the mud turns to move more panzers by train down south. I'd live with my post-mud early-winter decisions.
I don't have screenshots but I will say . . . it's still hard. I'm still getting pushed back in the South (expected) and south-center (expected as well.) I'm still losing trucks. I'm still able to make some headway with the winter-ready Finns. But it's less of a total hellscape of units getting smashed back under a torrent of Soviet troops seemingly unhindered by the Winter while my units crumble to pieces. I'm not longer running way ahead of historical German casualties in later November and early December. Heck, in the real world the Germans were trying to complete Typhoon and take Moscow in December. In my previous game I was getting torn apart across the front by US Thanksgiving.
All of that is to say I wussed out and set it on a different setting. We'll see how I do.
Subscribe to:
Posts (Atom)
