I decided to try an experiment with my Army Painter Quick Shade. I'd used it on a few minis I'd done detailed base coats on, but just couldn't seem to finish. You know, those minis that get 80% done and just sit there as you mull over how to wash and drybrush it best to bring out the colors, or why you debate the color scheme again, or where you just lost interest in the finishing process and want it done. They came out well, generally, good enough for tabletop use. But I wanted to do one from scratch, deliberately going fast, to see just how easily I could paint cannon fodder type minis.
My apologies for the so-so pictures; I have a camera for snap shots and I don't have a good miniature photographing setup.
Step One: Base Coat I took an assembled and grey-primed Warhammer crossbowman out of my collection (I think he's Empire Militia) and set to work. A quick base coat of black for his armor, maroon for his pants, crimson shirt, flesh tone, burnt umber boots, leather belt, brown and steel grey for his crossbow. I used a mix of Vallejo Colors, Reaper Pro Paints, and (mostly) Apple Barrel Colors.* I did no detail work here, I just painted within the lines.
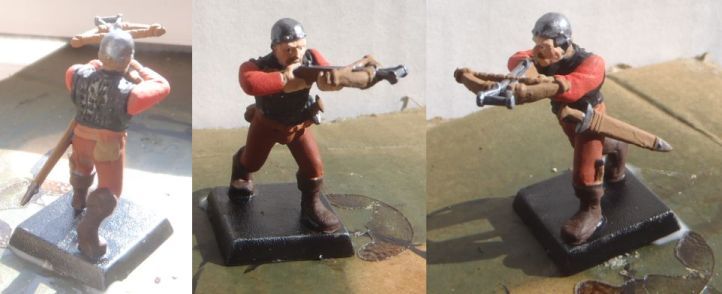
Step Two: Dip I dipped the guy and whipped off the excess. This was much easier with a plastic model. Notice his strong gloss tone at this point.

Step Three: Dull Cote After 24 hours of drying, I took him outside and hit him with my Testors Model Master Dullcote. My next experiment will use cheap clear coat, but for now I went with the "good stuff" as I was also sealing another mini that wasn't part of the experiment.
As you can (probably) see, the shine is gone completely. He's sealed nicely, he's got a dark tone and looks battlefield worn, and the details on the minis are revealed not obscured. He's ready for flocking if I choose to, or I'll just touch up his base with some "flagstone" looking patterns, and he's ready for the tabletop.

Pros: This stuff works as advertised. Dip, whip, and dry. Then dull coat and you're good to go, with a tabletop quality mini.
The minis are easily dulled back down, and despite the heavy coating if you dull coat and then do touch-up painting, the new layer sticks. I've put silver edging on swords and brightened up gemstones post-dull coat and it worked just fine.
The stuff is also consistent. It mixes easily, stays well, and you can get identical quality results from batch to batch. No worries on the difficulty of maintaining identical results that can come with DIY mixing.
Cons:
The stuff is expensive - I got my for less than 15% below list and it still cost me about $26 for a small can. It'll last a while but DIY painters who are willing to mix their own Magic Wash or vanish can save a lot of money. I've done that in the past but mine always dries up, I can't keep the mix consistent from batch to batch, and I have issues storing it. So I'm willing to plunk down extra money for the convenience and consistency of the Army Painter Quick shade but it's not cheap.
This stuff isn't for display figures, and I wouldn't use it for that. I just need strongly chip-resistant minis that look good on the tabletop. This is not to say you can't get pretty minis, just that it's not designed for "pretty" but for "fast and effective."
It stinks, and it's varnish. Get it on your hands and you better have some canola oil handy to clean up. Either way, it stains things, it's sticky, and the fumes are nasty.
The dip-grip-and-rip technique works best for 28mm plastics and gets less and less safe the larger and heavier the mini gets. Even gripping the base of a Copplestone ogre with strong pliers and a good solid grip, I was worried something would give and the mini would spike into the dirt like my first test mini did. It's a simple matter of physics, I think - the larger the mini, the more stress it undergoes at that sudden stop at the bottom that whips the paint off. For larger minis, I highly recommend you do the brush-on (or at least dip-and-brush-off) method described on the Army Painter website.
Overall: That's a lot of cons, against one real pro - it works. If you need to make tabletop minis, you don't have a lot of time for (or just not a lot of interest in) extensive detail work, and you want some damage resistance, this is a good tool. If you're painting for the display case, skip it.
* (And just as a total aside, most of my Citadel paints and Reaper Pro Paints died hard after sitting unused in my desk drawers for a few years. But 100% of my Vallejo paints and all but one metallic Apple Barrel color survived. Heck, my Ral Partha paints survived.)

Hurray, someone I know who's actually used this stuff! The army painter website seems quite bare of anything about what the heck the stuff is, which has made me suspicious that it wasn't anything fancy... Even if they do keep going on about how they've discovered deep magical mini voodoo.
ReplyDeleteYou mention doing your own varnish, which I admit contributes to that suspicion. Do you have any links to an article on doing that? I'd like to know what people consider is equivalent.
Varnish is pretty horrible, and with my asthma I probably won't be doing this (either with the Real Stuff or with home mix) but I'm intensely curious.
I've considered experimenting with the spray varnish used for fixing some kinds of artwork, it seems it would avoid the flick problem that the dip-flick method gets you into... although it won't be tinted for the "and I inked it!" effect.
I don't think it's really anything fancy or special, it's just well-made varnish designed for minis. So you get a good sealing coat and a well-inked/well-washed look in one.
DeleteI used to make my own magic wash all the time, but it just dried out so quickly between uses that I gave up. Plus I'd still need to do a lot of detail work before I used it. I'm sure I could mix up an equally good varnish but I'd rather spend the money and save the time and experimentation.
And if it helps, I've got asthma too. I use the varnish outside, and I let it dry indoors locked in a small room until the smell/fumes are all gone. It doesn't bother me at all.